
A professional reverse osmosis installation in Oklahoma takes about 2 to 4 hours start to finish for a standard under-sink system. The technician shuts off your cold water, taps the supply line, drills the dispenser faucet through the sink deck or countertop, mounts the unit and storage tank in the cabinet, ties the drain into the disposer or P-trap, flushes the membrane, and verifies TDS reduction before leaving. You can drink the water within 24 hours after the first full tank fills and dumps.
Before the Technician Arrives
Three things make install day go smoothly: clear access under the sink, knowing where you want the dispenser faucet, and a recent water quality test so we know what to expect from the membrane. Clear out cleaning supplies, trash bins, and anything stored in the cabinet. We need about 18 inches of working depth and a 14 by 14 footprint for the storage tank. If your cabinet is packed or your sink is a deep farmhouse style with limited under-clearance, mention it when you book, we sometimes recommend a basement or utility-room location with a remote dispenser line on those installs.
If your home is on a private well, we strongly recommend pulling our well water iron and sulfur guide before scheduling, the pretreatment stack changes the install plan. For city water customers in OKC or Tulsa, our hard water damage breakdown covers when an RO upgrade pairs well with a softener.
Dispenser placement is the one decision you cannot un-make easily. Most homeowners pick the back-right corner of the sink deck next to the main faucet. If you have an under-mount sink in granite or quartz, we drill through the stone, which adds 30 to 45 minutes and requires a diamond core bit. Picking a spot before we arrive saves time. Bring your spouse in on this decision, the dispenser is a permanent fixture and people have opinions.
The Equipment We Bring
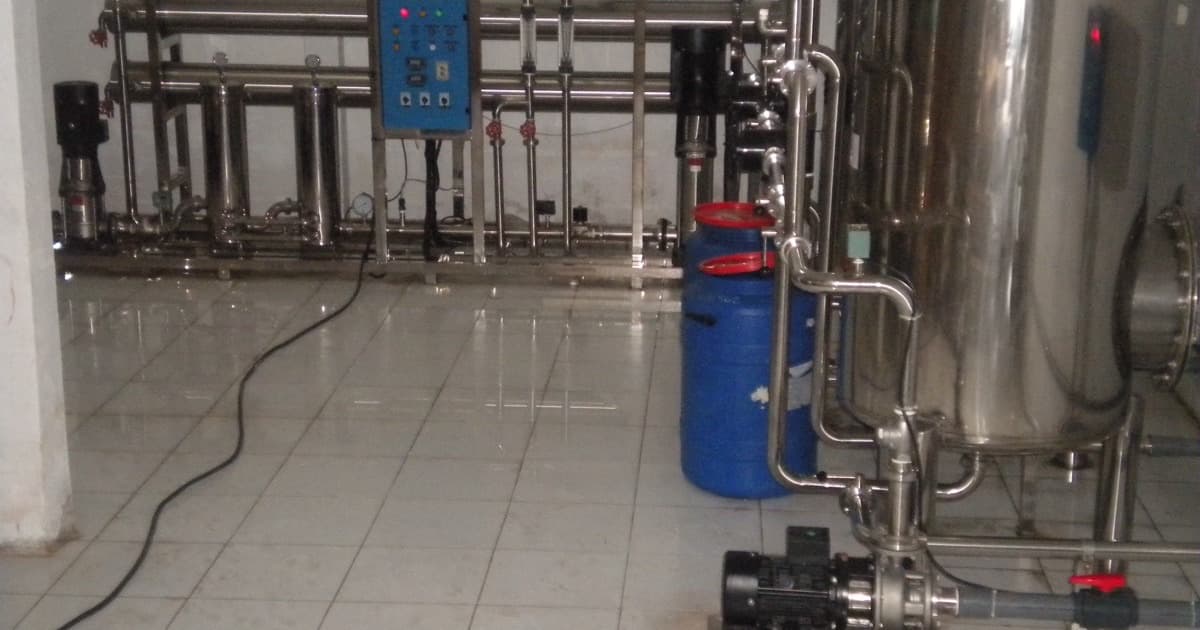
For a standard residential install in Oklahoma we arrive with: the RO unit itself (typically a 4 or 5 stage system with a quality membrane), a 3 to 4 gallon pressurized storage tank, the dispenser faucet (lead-free brass or stainless), a feed water adapter for the cold supply line, a drain saddle clamp or air-gap drain assembly, 1/4 inch food-grade tubing in colored runs, a tank shutoff valve, a TDS meter for verification, and the consumable filters and membrane. If your sink does not have a free hole and we are drilling through stone, we also bring the diamond core kit and a water-cooled drilling setup to prevent cracking.
We do not show up and run to Home Depot mid-install. Every part you need for a complete tie-in comes on the truck. If we hit something unexpected (corroded shutoff valve, undersized supply line, non-standard sink configuration), we will pause, explain options, and quote any add-on work before continuing.
Hour-by-Hour: What Actually Happens
Hour 0 to 0.5: Setup and Shutoff
We start with a quick water test at the sink to baseline your TDS and chlorine. Then we shut off the cold supply at the angle stop, open the cold tap to drain residual pressure, lay drop cloths in the cabinet and on the floor, and unbox the equipment. The dispenser hole gets marked, taped, and drilled (sink deck takes 5 minutes, stone takes 30 to 45).
Hour 0.5 to 1.5: Plumbing and Drain
The cold water feed gets tapped using a needle-valve adapter (no soldering, no cutting pipe). The drain line gets either a saddle clamp on the dishwasher tailpiece or an air-gap fitting if your local code requires it. Oklahoma plumbing code permits saddle-clamp drains on residential RO installs, but newer Edmond and Norman builds sometimes require an air gap, we follow your jurisdiction.
Hour 1.5 to 2.5: Mount and Tube
The RO body mounts to the cabinet sidewall with two screws. The storage tank sits upright on the floor of the cabinet, connected to the unit with a single 1/4 inch line. The dispenser faucet goes through the deck hole, gets sealed with a rubber gasket below and a chrome trim ring above, and the supply line runs up to it. All tubing connections use push-to-connect fittings rated for the working pressure, no glues or thread sealants on the food-contact side.
Hour 2.5 to 3.5: Flush, Pressurize, Verify
We turn the cold supply back on, open the tank valve, and let the membrane flush for 15 to 20 minutes (this water goes to drain, not to the dispenser). The tank then fills for the first time, about 60 to 90 minutes for a 3 gallon tank. We do not let you drink that first tank fill, the manufacturer flushes membranes with a food-grade preservative that needs to be rinsed out. So we dump the first full tank to drain before declaring the install complete.
Hour 3.5 to 4: TDS Verification and Walkthrough
Once the second tank starts filling, we measure TDS at the dispenser. A healthy install reduces TDS by 90 to 98% depending on inlet pressure and feed water quality. We log the number on your warranty card, walk you through filter-change intervals, show you where the shutoff valves are, and leave manuals and a sticker on the unit with our number and the membrane install date.
Recommended Method (Match Your Install Path to a Stack)
| Your situation | Recommended RO setup | Install time |
|---|---|---|
| City water, standard sink, free hole | 4-stage under-sink RO, standard tank | 2 to 2.5 hours |
| City water, granite countertop, no free hole | 4-stage under-sink RO, stone-drill dispenser | 2.5 to 3.5 hours |
| Well water, no iron, softener present | 5-stage RO with sediment prefilter, standard tank | 3 to 4 hours |
| Well water, low TDS but no softener | 5-stage RO, tank, dispenser, water pressure check | 3 to 4 hours |
| Tight cabinet or farmhouse sink | Remote tank in basement or utility, dispenser line run | 4 to 6 hours |
What You Cannot Drink Right Away
Three things have to happen before the water at your dispenser is ready to drink. First, the membrane preservative flush has to fully cycle (about 15 to 20 minutes of drain-only running). Second, the storage tank has to fill completely and dump once (about 60 to 90 minutes). Third, the system needs to settle for 4 to 6 hours so any residual air works out of the lines. We complete the first two before leaving. The third you handle by simply waiting.
The cleanest practice is to fill the tank, dump it once, then refill and use the second tank as your first drinking water. Most Oklahoma City and Tulsa metro installs are drinking-ready by the next morning. If you have an urgent need (formula for an infant, immunocompromised household member), we will schedule a follow-up TDS test 48 hours after install at no charge.
Call a Professional If
- You are on a private well with iron above 0.3 mg/L, the membrane will foul in months without a dedicated iron pretreatment stage
- You have low static water pressure (under 45 PSI), RO systems need a booster pump below that threshold
- Your home is on a private well with sediment, you need a 5-micron prefilter upstream of the RO or membrane life drops sharply
- You have a granite, quartz, or solid-surface countertop with no existing dispenser hole, stone drilling without water cooling cracks countertops
- Your cold supply line is galvanized or polybutylene, those should be addressed first
- You want the system in the basement, garage, or utility room with a remote dispenser run, that is a different install plan
Pricing for Install Day in Oklahoma in 2026
A complete professionally installed under-sink RO system in Oklahoma runs $700 to $1,600 in 2026, depending on the unit class and any add-ons. The system itself is $400 to $1,000, the install is $250 to $450, and add-ons like stone drilling, remote tank placement, or air-gap drain fittings run $50 to $250 each. Compare that to what an Oklahoma family of four spends on bottled water, typically $500 to $900 per year, and the system pays for itself in 12 to 24 months. For the full when-it-makes-sense breakdown see our honest RO guide.
Common Day-of Surprises (And How We Handle Them)
Even with a good pre-install conversation, things come up. The most common surprise is a corroded angle stop on the cold supply line. If the shutoff valve is 20+ years old and has never been cycled, it sometimes refuses to close or starts weeping after we try. We carry replacement angle stops on the truck (1/4-turn ball valves rated for potable water) and swap them in for $35 to $60 plus 15 minutes of work. We will not install a brand-new RO system behind a failing shutoff valve.
The second common surprise is a sink drain that does not have an obvious tie-in point. Disposers without a dishwasher port, double-bowl sinks with non-standard tailpieces, and air-admittance valve P-traps all require a different drain strategy. We carry universal drain saddle clamps, threaded air-gap fittings, and a few specialty tailpieces. If your specific configuration is unusual, we may pause and walk you through options before drilling.
The third surprise is a cabinet that turns out to be too shallow for the storage tank once everything is laid out. A standard 3 gallon pressurized tank is about 11 inches in diameter and 15 inches tall. If your under-sink cabinet has a garbage pull-out, a deep apron sink, or shelving that blocks the floor, we may recommend either a smaller 2.5 gallon tank or a remote tank location with a longer dispenser line. Both options work, neither is much more expensive, but the choice changes the install plan.
Maintenance After Install Day
Once installed, an RO system needs very little. Pre-filters get replaced every 6 to 12 months ($30 to $60), the post-carbon polish filter every 12 months ($25 to $40), and the membrane every 2 to 3 years ($60 to $120) depending on your feed-water quality. Oklahoma City municipal water lets membranes hit the longer end of that range. Hard well water or city water with high TDS shortens membrane life. We log your install date and send filter reminders by text 30 days before due.
For broader treatment options across the whole stack, the services overview covers every service we offer, and the water softener service page walks through whole-house upgrades. Customer feedback on past installs is on the reviews page, and our FAQ answers the most common pre-install questions in one place.
The tank is the part that almost never needs service. Quality steel pressure tanks hold their charge for 10 to 15 years. If you ever notice slow flow at the dispenser, it is almost always a clogged post-filter, not the tank or membrane.
Frequently Asked Questions
How long does a reverse osmosis install take in Oklahoma?
A standard under-sink RO install takes 2 to 4 hours start to finish. Cabinet access, dispenser drilling (especially through stone), and drain configuration are the biggest variables. Well water installs with sediment prefilters or iron pretreatment run longer. We give a firm time estimate when we see your sink during the free water test visit.
Can I drink the water right after the RO is installed?
Not from the first tank fill. The membrane ships with a food-grade preservative that needs to be flushed out, which takes one full tank dump. We complete that flush before leaving. The cleanest practice is to wait 4 to 6 hours after install for any residual air to work out of the lines, then start drinking from the next refill. Most installs are drinking-ready the next morning.
Will the installer drill through my granite countertop?
Yes, with a diamond core bit and water cooling to prevent cracking. Stone drilling adds 30 to 45 minutes to the install. We bring all the equipment needed. If you would rather avoid drilling stone, some installs use the existing sprayer hole or a side-mount option, mention this when scheduling.
Do I need to be home for the whole install?
You need to be present at the start (to confirm dispenser location, review the water test, and authorize work) and at the end (for the walkthrough, TDS verification, and warranty paperwork). You do not need to watch the middle hours. Most homeowners step out for an hour or two during plumbing and tubing work.
What if my home has low water pressure?
Standard RO membranes need at least 45 PSI of inlet pressure to produce well. Below that, recovery drops and you wait longer between dispenser pours. Wells with weak pressure systems and some rural Eastern Oklahoma homes need a booster pump, which adds about $150 to $250 to the install. We test static pressure during the free water test visit and quote the booster only if your numbers require it.
Does an RO system waste water?
Modern RO systems run about a 1:1 to 1:2 ratio of permeate to brine, meaning you send 1 to 2 gallons to drain for every gallon of clean water produced. For a family using 5 gallons of drinking and cooking water per day, that works out to 10 to 15 extra gallons down the drain, less than one toilet flush. Older 1:4 ratio systems are not worth installing in 2026.
Book a Free Water Test and a Day-of Plan
Before any RO system makes sense, you need to know what is in your water. Clean Water Systems provides free in-home water testing across Oklahoma City, Tulsa, Edmond, Moore, Norman, Muskogee, Tahlequah, and surrounding communities. We test hardness, iron, TDS, chlorine, and pH on the spot, and send out for nitrates, PFAS, or bacteria if your results indicate.
Call (918) 918-2216 or schedule online. Browse our reverse osmosis service page for system options, check financing, or read related articles on the Clean Water Systems blog. More on our background is on About, and our warranty applies to every installed system.